How to Automate Approval Workflows with Power Automate
Approval processes are everywhere. A manager signs off annual leave. Finance approves a purchase request. Marketing reviews a campaign before launch. HR confirms a policy update. The problem is not usually the approval itself. The problem is the manual process wrapped around it.
Too often, approval workflows still live in email threads, chat messages, spreadsheets, or someone’s memory. That leads to delays, unclear ownership, missing records, and the classic question nobody enjoys hearing: “Who approved this?”
Power Automate gives Microsoft 365 teams a practical way to replace those manual handoffs with structured, repeatable workflows. If you already use SharePoint, Teams, Outlook, or Forms, you can build approval flows without needing to become a developer.
TL;DR: A solid approval workflow usually starts with a trigger, sends an approval request to the right person, waits for a response, then updates a record and sends notifications automatically. The real value is consistency: fewer manual chases, clearer status tracking, and better process control.
For many teams, the easiest starting point is a SharePoint list plus a basic approval flow in Power Automate. That combination gives you a practical approval system without needing custom development.
1) What is an approval workflow?
An approval workflow is a repeatable process that sends a request to one or more people, captures their decision, and then takes action based on the outcome. That action might be updating a status, creating a task, sending a notification, unlocking the next step, or recording the decision for audit purposes.
In a manual process, this often happens through email. Someone sends a request, waits, follows up, receives a reply, then updates a spreadsheet or tells the next person. It works, but only if everyone remembers what to do and when to do it.
In an automated process, the workflow handles the routine parts. The approval request goes to the right person, reminders can be triggered, decisions are captured consistently, and the underlying record is updated automatically. The process becomes easier to manage because it no longer depends on memory or ad hoc messages.
Simple definition: an approval workflow is a structured decision process. Power Automate turns it from a manual chase into an automated sequence.
2) Why automate approval workflows?
The biggest reason is not novelty. It is process reliability. Automated approvals reduce the friction around common requests and make it easier to answer simple operational questions such as what is waiting, who approved it, when it was decided, and what happened next.
That matters for both small teams and larger organisations. In smaller teams, automation removes repetitive admin. In larger environments, it creates consistency across departments and helps reduce informal workarounds.
- Faster decisions and fewer follow-up emails
- Clearer ownership and status tracking
- Better audit trail for requests and outcomes
- More consistent business processes
- Less manual admin for teams and managers
- SharePoint can store the request record
- Outlook and Teams can notify approvers
- Forms can capture user submissions
- Power Automate can route, decide, and update automatically
That is also why approval workflows are often one of the first practical Power Automate use cases teams implement. They are easy to understand, clearly valuable, and directly connected to everyday work.
3) Common approval workflow use cases
A good approval flow starts with a real business need, not the tool itself. The strongest use cases are repetitive, rules-based, and currently slowed down by manual follow-up.
Employees submit a request, managers approve or reject, and the request record updates automatically.
Requests can route to a manager, then finance, with different paths based on cost thresholds.
Policies, forms, or content can move through approval before being published or shared more widely.
Operational or IT requests can be reviewed and approved before an action is taken.
If your organisation already uses SharePoint for lists, libraries, and collaboration, approval workflows are often a natural next step because the records already have a place to live.
4) Before you build: plan the process first
One of the easiest mistakes in Power Automate is automating a process that is still unclear. Before opening the flow designer, make sure the real-world process makes sense. If the business rules are inconsistent, the automation will simply make inconsistency happen faster.
Ask a few basic questions first.
If you are new to this, a one-stage approval flow tied to a SharePoint list is usually the best starting point. It keeps the process visible and makes troubleshooting much easier than trying to automate everything at once.
5) Step-by-step: build a simple approval workflow with Power Automate
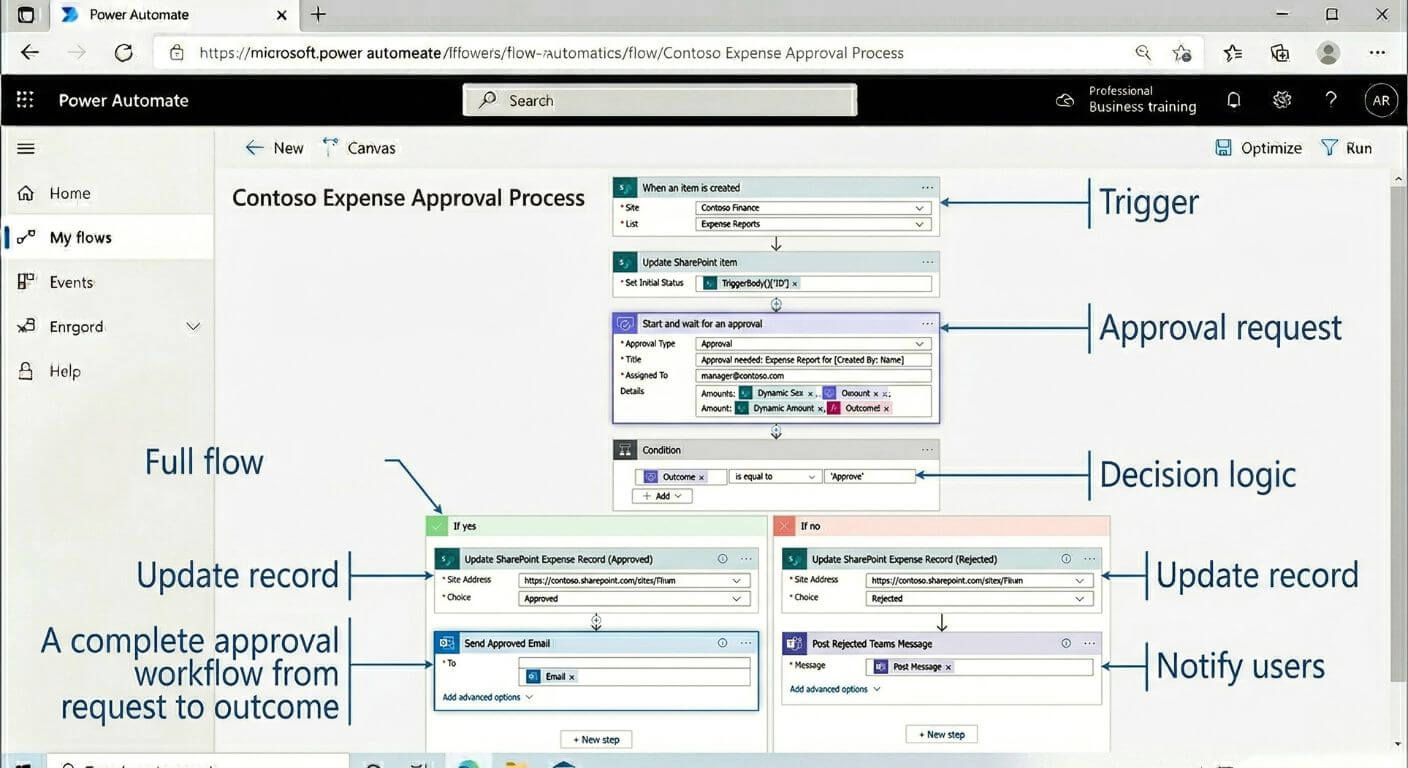
Let’s walk through a common scenario: a SharePoint list stores approval requests, and when a new item is added, Power Automate sends an approval request to a manager. Once a decision is made, the list item updates and the requester is notified.
A SharePoint list works very well for approval requests because it gives you a structured place to store title, requester, department, approver, cost, comments, and status.
Keep the columns simple and useful. For example: Request Title, Requested By, Approval Type, Amount, Approver, Status, and Notes.
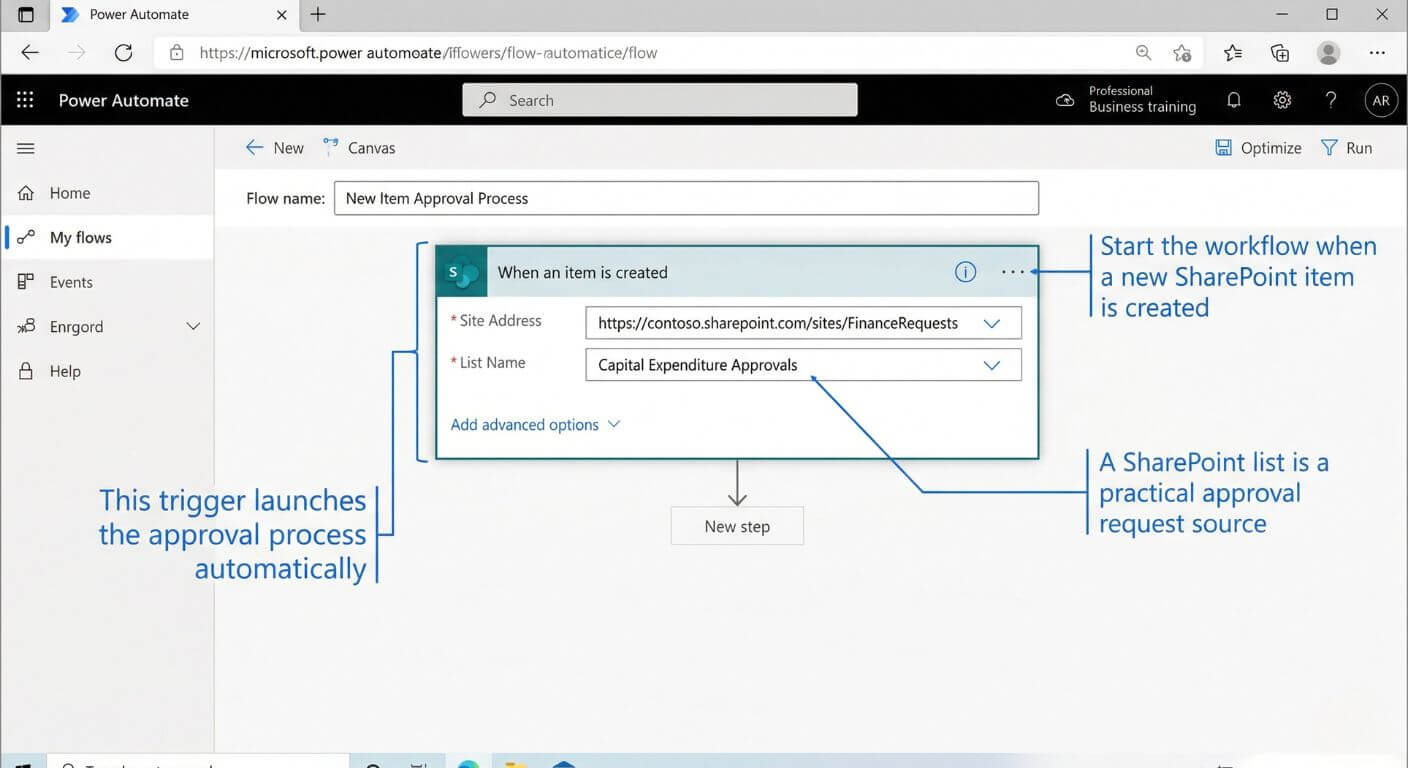
Create a cloud flow and select a trigger such as When an item is created for SharePoint. This means every new request automatically starts the workflow.
This is often the simplest entry point because the request data already exists in a structured format.
Before sending the approval, update the request status to something like Pending Approval. This makes the list easier to understand and gives users immediate feedback that the request is in progress.
Status tracking is a small detail, but it makes a big difference when people check the list later.
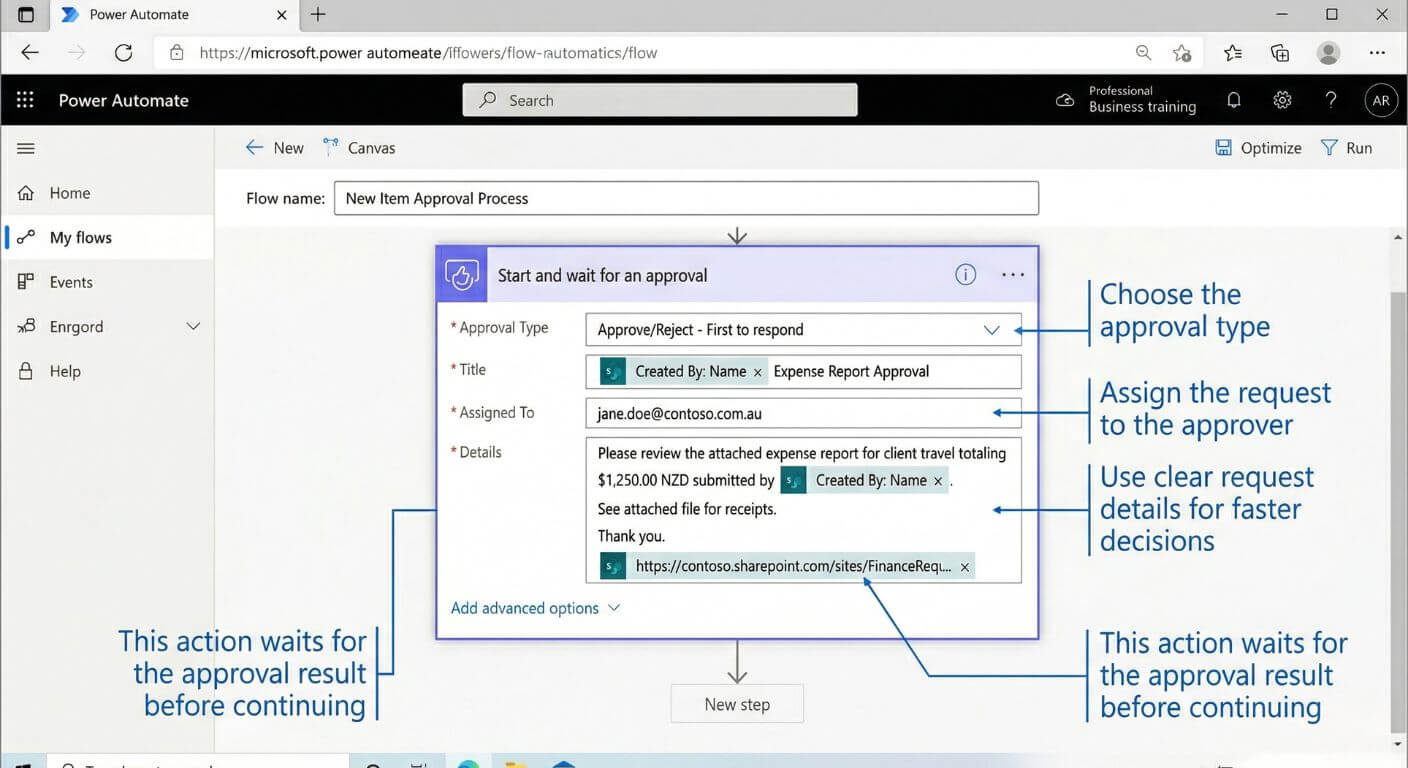
Use the Start and wait for an approval action. Choose the approval type that suits your process, such as first response or everyone must approve.
Populate the title, details, and assigned approver using dynamic content from your list item so the request contains meaningful information.
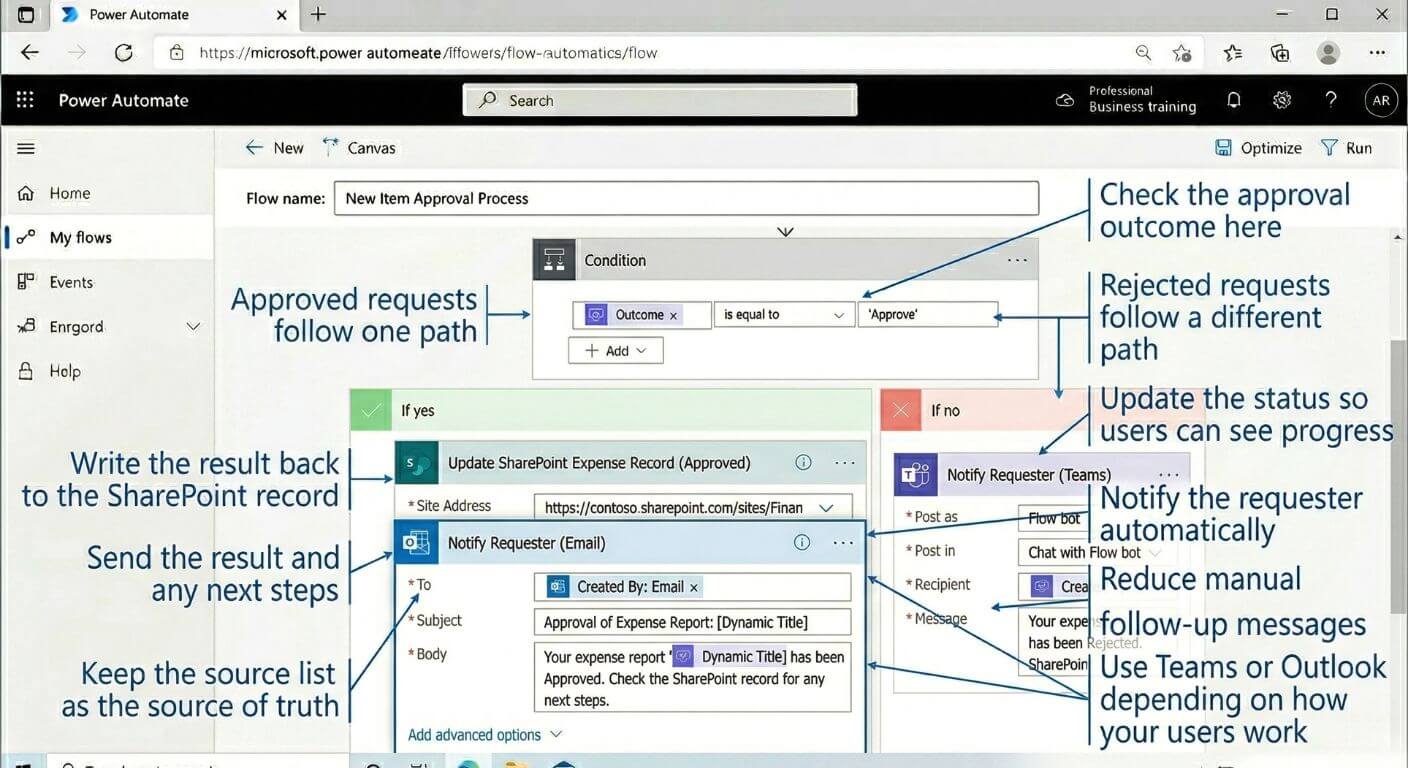
Once the approval returns a result, add a condition to check whether the response is approved or rejected.
This is where your flow branches into the next action. Approved requests and rejected requests should not end in the same way.
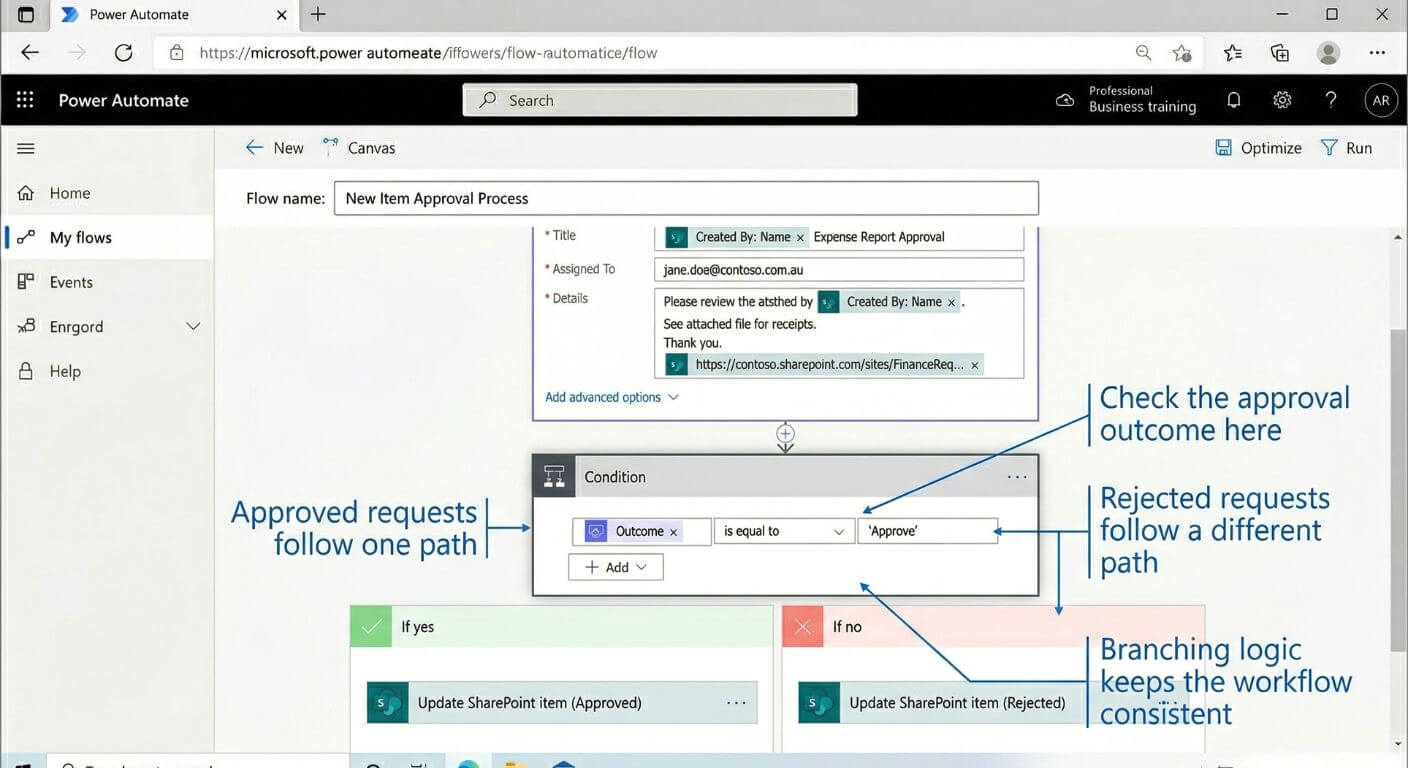
Update the SharePoint item with the approval result, comments, and final status. For example: Approved, Rejected, or Returned for changes.
This step is crucial because it makes your list the source of truth, not just the email notification.
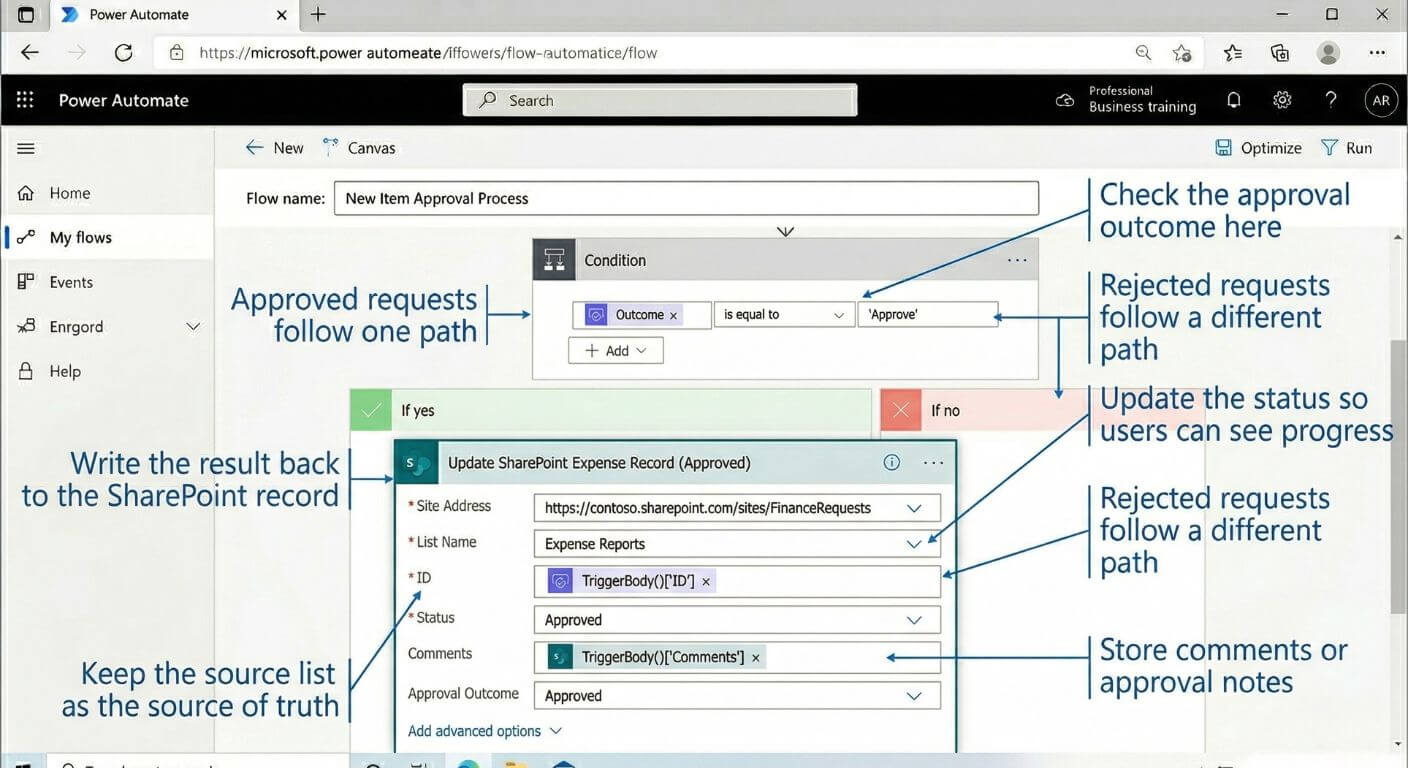
Use Outlook or Teams actions to notify the requester and, if needed, the next process owner. Include the status, comments, and any next-step instructions.
This reduces confusion and avoids the need for separate manual updates.
Run the workflow with real-world examples, including approvals, rejections, missing values, and the wrong approver. Testing only the happy path is one of the easiest ways to end up with production issues later.
Good testing helps reveal whether the process design is clear enough before more people start using it.
Once that basic pattern is working, you can expand it with approval tiers, reminders, escalations, and branching logic. That is usually a better progression than trying to build a complicated flow from day one.
6) Design tips for better approval flows
A technically working flow is not always a well-designed one. Good approval workflows are easy for users to understand, easy for admins to support, and easy to audit later.
Pending, Approved, Rejected, Cancelled is usually more useful than a long list of vague states.
Approvers are more likely to respond quickly when the request is clearly labelled and includes useful context.
Do not rely on the email alone. Update the list or record so the process remains visible to others.
Think about missing approvers, changed managers, cancelled requests, and late responses before they happen.
That is where beginner-level Power Automate work starts becoming intermediate-level automation design. The tool itself is approachable, but the quality of the process still depends on clear logic and sensible decisions.
For teams that want stronger foundations, Nexacu’s Power Automate Beginner and Power Automate Intermediate courses are a practical next step, especially when your workflows start involving conditions, expressions, and more tailored logic.
7) Quick fixes for common approval workflow issues
Most approval flow problems are not caused by Power Automate being mysterious. They are usually caused by missing data, unclear logic, or small setup issues that were easy to overlook during the first build.
Check the trigger, connector permissions, and whether the source item is being created the way the flow expects.
Review the field mapping and any lookup logic used to assign approvers dynamically.
Check the update item action carefully. Flows often work up to the approval stage but fail on the final record update.
Add clear notifications for both approved and rejected outcomes so requesters are not left guessing.
Useful habit: always review a flow run after testing. The run history usually tells you where the process is succeeding, stalling, or failing.
8) FAQs (expand to read)
These are some of the most common questions teams ask when they first start automating approval workflows.
Do I need coding skills to build approval flows in Power Automate?
Not usually. Many approval workflows can be built using standard triggers, approval actions, and conditions. More advanced flows may involve expressions and logic, but you do not need to be a developer to get started.
What is the best place to store approval requests?
A SharePoint list is often the best starting point because it is structured, easy to update, and works well with Power Automate triggers and record updates.
Can I send approval notifications in Teams as well as email?
Yes. Depending on the design, approval-related notifications can be sent through Outlook, Teams, or both. The best option depends on how your users already work.
What is the difference between a beginner and intermediate Power Automate workflow?
A beginner workflow usually handles a straightforward trigger, a simple approval, and a basic update. Intermediate workflows often add branching logic, dynamic approvers, expressions, arrays, JSON handling, and more tailored process design.
Which Nexacu course is best if I want to build approval workflows?
If you are getting started, Power Automate Beginner is the best place to start. If you already understand basic flows and want more control over logic and customisation, Power Automate Intermediate is the natural next step.
9) The bottom line
Approval workflows are one of the most practical ways to start using Power Automate because the value is easy to see. They reduce manual handling, make status clearer, and help teams move from ad hoc decisions to repeatable business processes.
For many Microsoft 365 teams, the easiest pattern is simple: store requests in SharePoint, trigger the flow in Power Automate, send the approval, then write the decision back to the record and notify the right people. Once that works well, more advanced automation becomes much easier to justify and design.
In short, approval workflows are not just about getting a yes or no. They are about improving how work moves through the business.
Learn to build approval flows, notifications, and smarter automations with Nexacu
Nexacu’s Power Automate courses teach you to build approval flows, notifications, and data-driven automations in one day. Whether you are starting from templates or moving into more customised logic, structured training can help you build with more confidence.
- SharePoint lists and libraries
Create the structure your approval data depends on
- Notifications and collaboration
Connect email and Teams into the process cleanly
- Better automation design
Move from basic flows to more dependable business processes
Note: menu labels and connector names can vary slightly depending on your Microsoft environment and licensing. Keep the first version of your approval flow simple, then expand it once the core process is working well.